Unlock Summer Flavor: How to Make Sun-Dried Tomatoes in Your Oven or Dehydrator
As the vibrant summer garden season draws to a close, many home growers find themselves with an abundant harvest of ripe, juicy tomatoes. While canning salsa, making pasta sauce, or freezing diced tomatoes are popular preservation methods, there's another fantastic way to capture that intense, sweet-tart taste: transforming them into "sun-dried" tomatoes. Imagine savoring the concentrated essence of your homegrown bounty in the dead of winter – a true taste of summer, no matter the season.
The traditional image of sun-dried tomatoes often conjures up idyllic scenes of tomatoes laid out under the scorching Mediterranean sun. While this method is certainly authentic, it's simply not practical for most of us. Locations with consistently hot, dry climates are ideal for natural sun-drying, but for the majority living in more humid, rainy, or cooler regions, direct sun exposure just won't cut it. The good news? You don't need a specific climate to achieve that beloved sun-dried flavor. Modern kitchen appliances like your oven or a food dehydrator can perfectly replicate the slow, gentle drying process, allowing you to master
Make Sun-Dried Tomatoes Indoors: Oven & Dehydrator Guide with ease. This method delivers delicious dehydrated tomatoes that taste exactly like their sun-kissed counterparts, often in less than a day, rather than several days of weather-dependent drying.
Choosing the Right Tomatoes for Drying Success
The journey to perfect dehydrated tomatoes begins with selecting the right variety. While you can technically dry any tomato, certain types yield superior results. The key is to look for tomatoes that are:
*
Small and Meaty: Smaller tomatoes like cherry, grape, or Campari varieties are ideal. Their higher flesh-to-seed and juice ratio means less water to remove, resulting in a more concentrated flavor and faster drying time.
*
Low Moisture Content: Paste tomatoes, such as Roma or San Marzano, are another excellent choice because of their naturally lower water content and thick walls.
Throughout the garden season, cherry tomatoes often produce early and in great abundance, making them a top candidate for dehydration. Their small size is also a bonus for preparation, requiring minimal effort. However, don't shy away from using other suitable varieties – the principle remains the same.
Essential Preparation Steps for Optimal Drying
Proper preparation is crucial for efficient and effective drying, ensuring your tomatoes achieve that perfect chewy-yet-pliable texture.
1.
Washing and Cleaning: Begin by thoroughly washing your tomatoes under cool running water. Pat them dry with a clean cloth.
2.
Slicing for Success:
*
Cherry, Grape, Campari Tomatoes: For these smaller varieties (typically under 1.5-2 inches), simply slice them in half lengthwise.
*
Paste Tomatoes or Larger Varieties: If your tomatoes are larger than 2 inches, you'll need to cut them into smaller, uniform pieces – usually halves, quarters, or thick slices (about 1/4 to 1/2 inch thick). Uniformity is key for even drying.
3.
Removing Seeds and Core: This step is vital to reduce moisture and prevent potential spoilage.
*
Smaller Tomatoes: For cherry or grape tomatoes, gently squeeze each half over a sink or bowl until most of the seeds and watery pulp are expelled. A small spoon can help dislodge stubborn seeds.
*
Larger Tomatoes: Use a spoon or your fingers to scoop out the seedy gel and core from each piece. Don't worry about getting every single seed, but aim to remove the majority.
Once prepared, your tomatoes are ready for the drying process. Whether you opt for the steady warmth of your oven or the consistent airflow of a dehydrator, these foundational steps ensure the best outcome.
The Oven Method: Crafting Sun-Dried Tomatoes Indoors
For those without a dedicated dehydrator, your kitchen oven is a perfectly capable tool for creating delicious dried tomatoes. This method leverages low heat over an extended period to slowly draw out moisture.
1.
Preheat Your Oven: Turn your oven to its lowest possible temperature setting, typically between 175°F and 225°F (80°C to 107°C). The goal is to dehydrate, not cook, the tomatoes. If your oven has a "warm" or "proof" setting, these might also be suitable, though you'll need to monitor temperature closely.
2.
Prepare Baking Sheets: Line baking sheets with parchment paper or silicone baking mats. This prevents sticking and makes cleanup a breeze.
3.
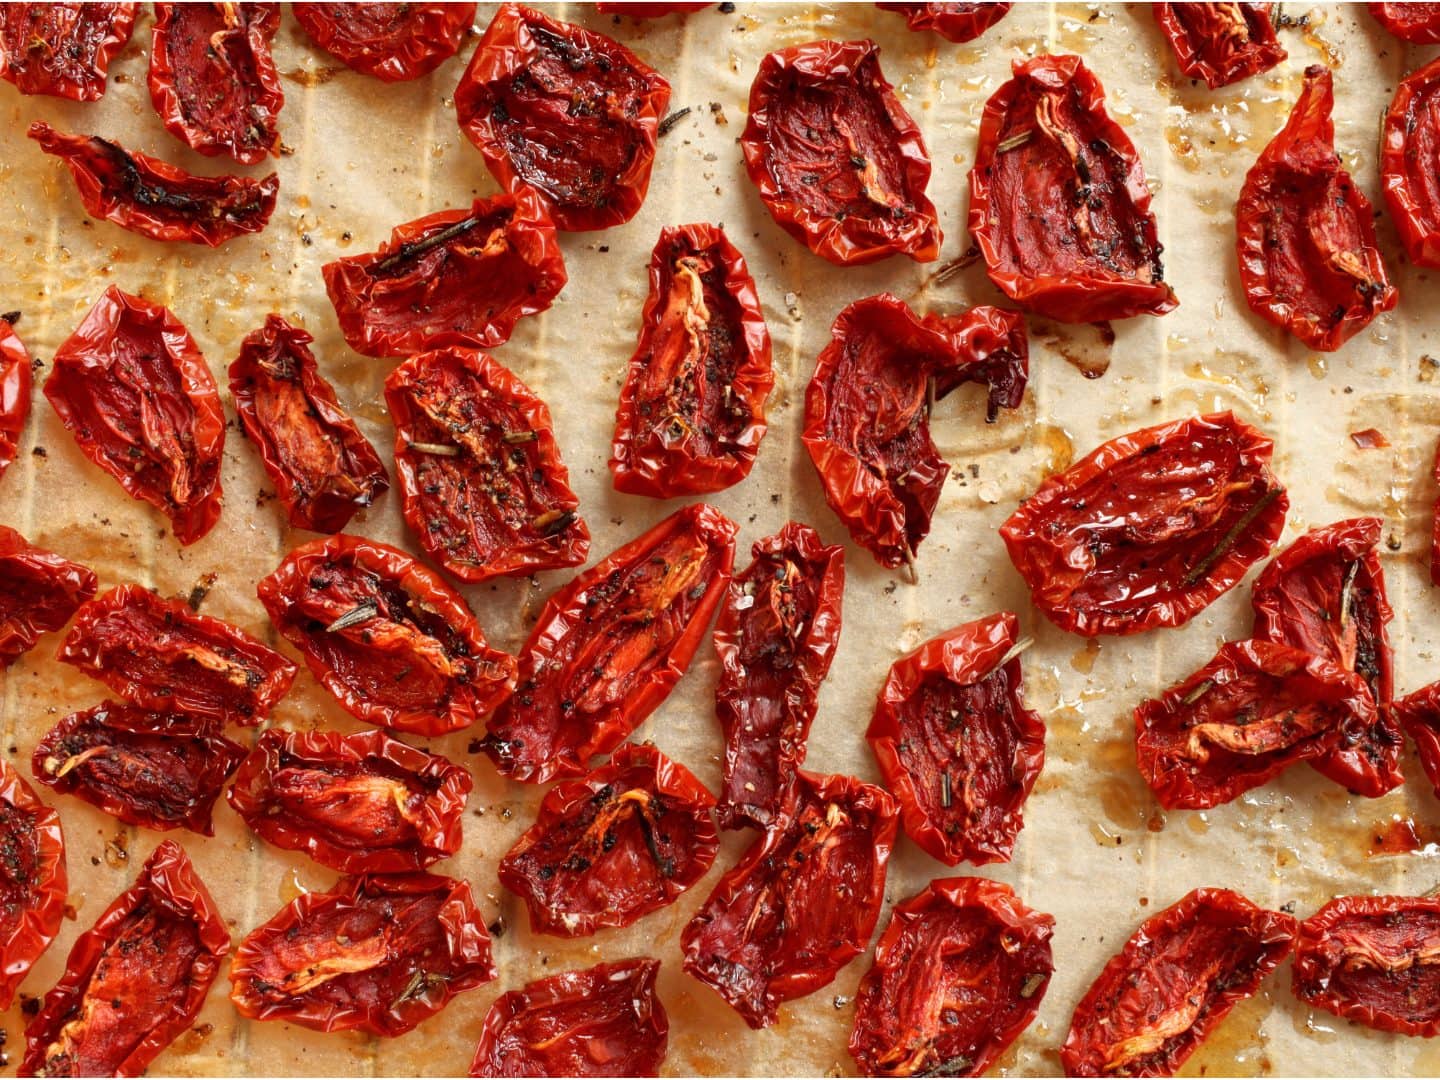
Arrange Tomatoes: Place the prepared tomato halves or pieces cut-side up on the lined baking sheets, ensuring there's a little space between each piece for air circulation. Avoid overcrowding the trays, as this can prolong drying time and lead to uneven results.
4.
Drying Time and Monitoring: Place the baking sheets in the preheated oven. The drying process will typically take anywhere from 4 to 8 hours, though this can vary significantly based on your oven's calibration, the tomatoes' moisture content, and ambient humidity.
*
Initial Check: Begin checking the tomatoes around the 3-4 hour mark.
*
Visual Cues: They are ready when they are significantly shriveled, leathery, and pliable but no longer soft or juicy. They should feel dry to the touch but not brittle or crispy. Some might even have a slightly sticky texture, which is fine.
*
Rotation: If you're using multiple trays, rotate them periodically (e.g., every 1-2 hours) to ensure even drying. You might also need to remove smaller, drier pieces sooner than larger ones.
*
Crack the Door: For ovens that don't vent moisture well, you can prop the oven door open slightly with a wooden spoon. This helps humidity escape, speeding up the drying process. However, be cautious with energy consumption.
5.
Cooling: Once dried, remove the tomatoes from the oven and let them cool completely on the baking sheets. They will become firmer as they cool.
The Dehydrator Method: Consistent Drying with Ease
A food dehydrator offers a more controlled and often more energy-efficient way to dry tomatoes. It provides consistent low heat and excellent airflow, making it an ideal tool for this task. This method is particularly recommended if you frequently preserve produce, offering a hands-off approach to making delicious
No Sun? Get Sun-Dried Tomato Flavor in Your Oven or Dehydrator.
1.
Set Temperature: Most dehydrators have specific settings for fruits and vegetables. Aim for a temperature between 125°F and 135°F (52°C to 57°C). This lower temperature range helps preserve nutrients and flavor without "cooking" the tomatoes.
2.
Arrange Tomatoes: Place your prepared tomato halves or pieces, cut-side up, in a single layer on the dehydrator trays. Ensure good spacing between them for optimal air circulation. You can fill multiple trays as long as there's sufficient airflow.
3.
Drying Time: The drying process in a dehydrator typically takes 6 to 12 hours, sometimes longer depending on the thickness of your tomatoes and the humidity.
*
Regular Checks: Check the tomatoes every few hours, rotating trays if your dehydrator doesn't have a built-in fan or if you notice uneven drying.
*
Doneness Cues: They are done when they are leathery, pliable, and show no signs of moisture when pressed. They should bend without cracking but not feel soft or squishy.
4.
Cooling: Once dried, remove the tomatoes from the dehydrator and let them cool completely before storing.
Storing Your Homemade Dried Tomatoes
Proper storage is key to extending the shelf life of your beautifully preserved tomatoes.
*
Airtight Containers: For short-term storage (up to a month), place completely cooled dried tomatoes in airtight jars or containers at room temperature.
*
Olive Oil Immersion: For longer storage and enhanced flavor, pack the dried tomatoes tightly into clean glass jars and cover them completely with good quality olive oil. You can add herbs like dried oregano, rosemary, or garlic cloves to infuse extra flavor. Ensure all tomatoes are submerged to prevent spoilage. Store these in the refrigerator for several months.
*
Freezing: For the longest shelf life (up to a year), dried tomatoes can be frozen in airtight freezer bags or containers. This is especially good for tomatoes dried without oil.
Culinary Delights: Using Your Dried Tomatoes
Your homemade dried tomatoes are incredibly versatile and can elevate a multitude of dishes:
*
Pasta Dishes: Chop and add to pasta sauces, pestos, or simply toss with olive oil, garlic, and fresh herbs for a quick meal.
*
Salads: Add a burst of intense flavor to green salads, grain salads, or even potato salads.
*
Sandwiches & Wraps: Layer them into sandwiches, paninis, or wraps for a gourmet touch.
*
Baked Goods: Incorporate into savory muffins, scones, or breads.
*
Sauces & Dips: Blend into hummus, tapenades, or creamy dips.
*
Snacks: Enjoy them straight from the jar as a healthy, flavorful snack.
If your dried tomatoes are stored without oil and you want a softer texture, simply rehydrate them by soaking in warm water or broth for 15-30 minutes before use. The liquid can then be added to your dish for extra flavor.
Preserving your garden tomatoes by drying them in the oven or a dehydrator is a truly rewarding endeavor. Not only does it allow you to enjoy the concentrated essence of summer throughout the year, but it's also a fantastic way to minimize food waste and add a gourmet touch to your cooking. With these simple methods, you can confidently turn your late-season bounty into a pantry full of flavorful "sun-dried" treasures, ready to brighten any meal.